GitLab Pages from A to Z: Part 3
Article Type: user guide || Level: beginner || Author: Marcia Ramos || Publication date: 2017-02-22 || Last updated: 2017-09-28
- Part 1: Static sites and GitLab Pages domains
- Part 2: Quick start guide - Setting up GitLab Pages
- Part 3: Setting Up Custom Domains - DNS Records and SSL/TLS Certificates
- Part 4: Creating and tweaking
.gitlab-ci.ymlfor GitLab Pages
Setting Up Custom Domains - DNS Records and SSL/TLS Certificates
As described in the previous part of this series, setting up GitLab Pages with custom domains, and adding SSL/TLS certificates to them, are optional features of GitLab Pages.
These steps assume you've already set your site up and and it's served under the default Pages domain namespace.gitlab.io, or namespace.gitlab.io/project-name.
Adding your custom domain to GitLab Pages
To use one or more custom domain with your Pages site, there are two things you should consider first, which we'll cover in this guide:
- Either if you're adding a root domain or a subdomain, for which you'll need to set up DNS records
- Whether you want to add an SSL/TLS certificate or not
To finish the association, you need to add your domain to your project's Pages settings.
Let's start from the beginning with DNS records. If you already know how they work and want to skip the introduction to DNS, you may be interested in skipping it until the TL;DR section below.
DNS Records
A Domain Name System (DNS) web service routes visitors to websites
by translating domain names (such as www.example.com) into the
numeric IP addresses (such as 192.0.2.1) that computers use to
connect to each other.
A DNS record is created to point a (sub)domain to a certain location, which can be an IP address or another domain. In case you want to use GitLab Pages with your own (sub)domain, you need to access your domain's registrar control panel to add a DNS record pointing it back to your GitLab Pages site.
Note that how to add DNS records depends on which server your domain is hosted on. Every control panel has its own place to do it. If you are not an admin of your domain, and don't have access to your registrar, you'll need to ask for the technical support of your hosting service to do it for you.
To help you out, we've gathered some instructions on how to do that for the most popular hosting services:
- Amazon
- Bluehost
- CloudFlare
- cPanel
- DreamHost
- Go Daddy
- Hostgator
- Inmotion hosting
- Media Temple
- Microsoft
If your hosting service is not listed above, you can just try to search the web for "how to add dns record on ".
DNS A record
In case you want to point a root domain (example.com) to your
GitLab Pages site, deployed to namespace.gitlab.io, you need to
log into your domain's admin control panel and add a DNS A record
pointing your domain to Pages' server IP address. For projects on
GitLab.com, this IP is 52.167.214.135. For projects leaving in
other GitLab instances (CE or EE), please contact your sysadmin
asking for this information (which IP address is Pages server
running on your instance).
Practical Example:

DNS CNAME record
In case you want to point a subdomain (hello-world.example.com)
to your GitLab Pages site initially deployed to namespace.gitlab.io,
you need to log into your domain's admin control panel and add a DNS
CNAME record pointing your subdomain to your website URL
(namespace.gitlab.io) address.
Notice that, despite it's a user or project website, the CNAME
should point to your Pages domain (namespace.gitlab.io),
without any /project-name.
Practical Example:

TL;DR
| From | DNS Record | To |
|---|---|---|
| domain.com | A | 52.167.214.135 |
| subdomain.domain.com | CNAME | namespace.gitlab.io |
Notes:
- Do not use a CNAME record if you want to point your
domain.comto your GitLab Pages site. Use anArecord instead.- Do not add any special chars after the default Pages domain. E.g., do not point your
subdomain.domain.comtonamespace.gitlab.io.ornamespace.gitlab.io/.- GitLab Pages IP on GitLab.com has been changed from
104.208.235.32to52.167.214.135.
Add your custom domain to GitLab Pages settings
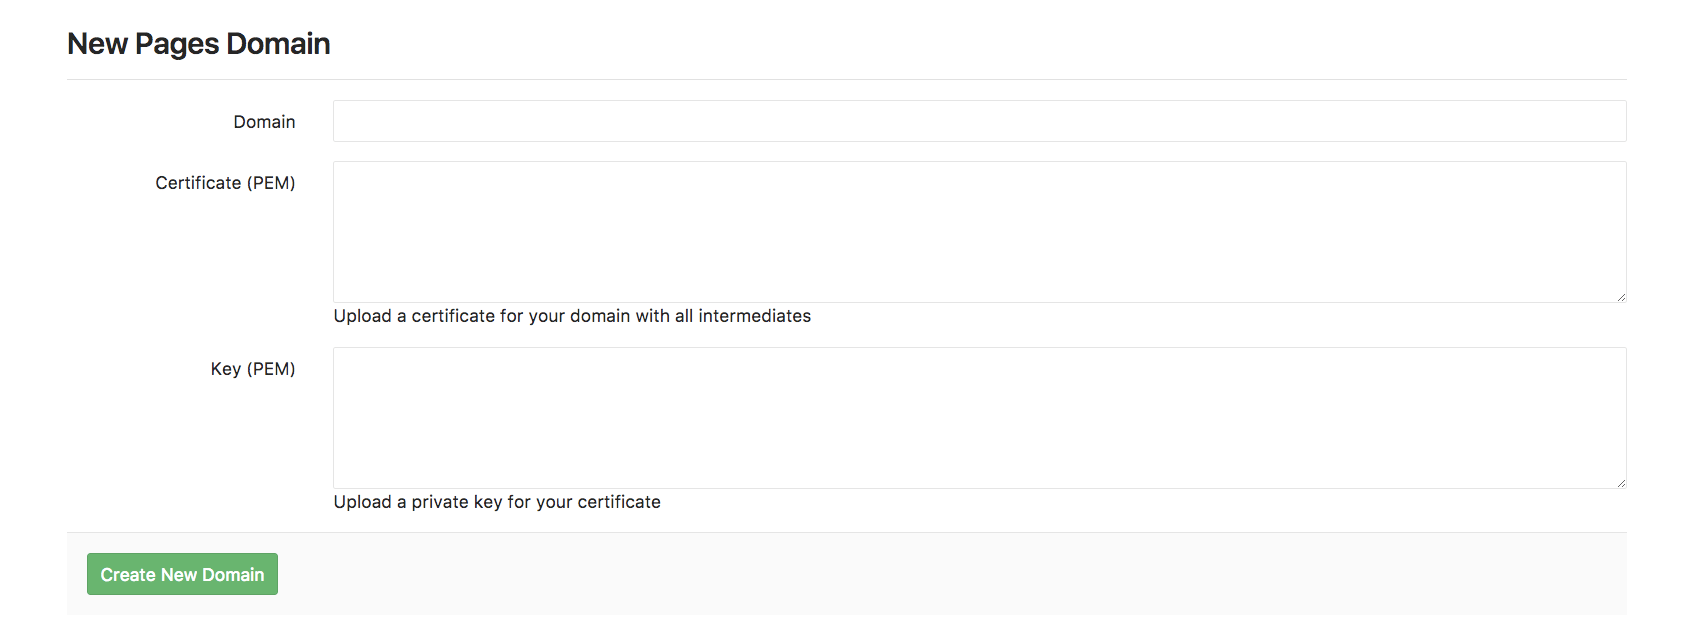
Once you've set the DNS record, you'll need navigate to your project's Setting > Pages and click + New domain to add your custom domain to GitLab Pages. You can choose whether to add an SSL/TLS certificate to make your website accessible under HTTPS or leave it blank. If don't add a certificate, your site will be accessible only via HTTP:
You can add more than one alias (custom domains and subdomains) to the same project. An alias can be understood as having many doors leading to the same room.
All the aliases you've set to your site will be listed on Setting > Pages. From that page, you can view, add, and remove them.
Note that DNS propagation may take some time (up to 24h), although it's usually a matter of minutes to complete. Until it does, visit attempts to your domain will respond with a 404.
Read through the general documentation on GitLab Pages to learn more about adding custom domains to GitLab Pages sites.
SSL/TLS Certificates
Every GitLab Pages project on GitLab.com will be available under
HTTPS for the default Pages domain (*.gitlab.io). Once you set
up your Pages project with your custom (sub)domain, if you want
it secured by HTTPS, you will have to issue a certificate for that
(sub)domain and install it on your project.
Note: Certificates are NOT required to add to your custom (sub)domain on your GitLab Pages project, though they are highly recommendable.
The importance of having any website securely served under HTTPS is explained on the introductory section of the blog post Secure GitLab Pages with StartSSL.
The reason why certificates are so important is that they encrypt the connection between the client (you, me, your visitors) and the server (where you site lives), through a keychain of authentications and validations.
Issuing Certificates
GitLab Pages accepts PEM certificates issued by Certificate Authorities (CA) and self-signed certificates. Of course, you'd rather issue a certificate than generate a self-signed, for security reasons and for having browsers trusting your site's certificate.
There are several different kinds of certificates, each one with certain security level. A static personal website will not require the same security level as an online banking web app, for instance. There are a couple Certificate Authorities that offer free certificates, aiming to make the internet more secure to everyone. The most popular is Let's Encrypt, which issues certificates trusted by most of browsers, it's open source, and free to use. Please read through this tutorial to understand how to secure your GitLab Pages website with Let's Encrypt.
With the same popularity, there are certificates issued by CloudFlare, which also offers a free CDN service. Their certs are valid up to 15 years. Read through the tutorial on how to add a CloudFlare Certificate to your GitLab Pages website.
Adding certificates to your project
Regardless the CA you choose, the steps to add your certificate to your Pages project are the same.
What do you need
- A PEM certificate
- An intermediate certificate
- A public key
These fields are found under your Project's Settings > Pages > New Domain.
What's what?
- A PEM certificate is the certificate generated by the CA, which needs to be added to the field Certificate (PEM).
- An intermediate certificate (aka "root certificate") is the part of the encryption keychain that identifies the CA. Usually it's combined with the PEM certificate, but there are some cases in which you need to add them manually. CloudFlare certs are one of these cases.
- A public key is an encrypted key which validates your PEM against your domain.
Now what?
Now that you hopefully understand why you need all of this, it's simple:
- Your PEM certificate needs to be added to the first field
- If your certificate is missing its intermediate, copy and paste the root certificate (usually available from your CA website) and paste it in the same field as your PEM certificate, just jumping a line between them.
- Copy your public key and paste it in the last field
Note: Do not open certificates or encryption keys in regular text editors. Always use code editors (such as Sublime Text, Atom, Dreamweaver, Brackets, etc).
| ← Part 2: Quick start guide - Setting up GitLab Pages | Part 4: Creating and tweaking .gitlab-ci.yml for GitLab Pages → |