High Availability on AWS
GitLab on AWS can leverage many of the services that are already configurable with High Availability. These services have a lot of flexibility and are able to adopt to most companies, best of all is the ability to automate both vertical and horizontal scaling.
In this article we'll go through a basic HA setup where we'll start by configuring our Virtual Private Cloud and subnets to later integrate services such as RDS for our database server and ElastiCache as a Redis cluster to finally manage them within an auto scaling group with custom scaling policies.
Where to Start
Login to your AWS account through the My Account dropdown on
https://aws.amazon.com or through the URI assigned to your team such as
https://myteam.signin.aws.amazon.com/console/. You'll start on the
Amazon Web Services console from where we can choose all of the services
we'll be using to configure our cloud infrastructure.
Network
We'll start by creating a VPC for our GitLab cloud infrastructure, then we can create subnets to have public and private instances in at least two AZs. Public subnets will require a Route Table keep an associated Internet Gateway.
VPC
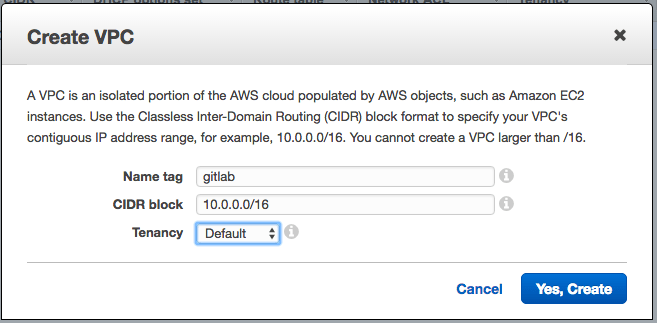
Start by looking for the VPC option on the web console. Now create a new
VPC. We can use 10.0.0.0/16 for the CIDR block and leave tenancy as
default if we don't require dedicated hardware.
If you're setting up the Elastic File System service then select the VPC and from the Actions dropdown choose Edit DNS Hostnames and select Yes.
Subnet
Now let's create some subnets in different Availability Zones. Make sure that each subnet is associated the the VPC we just created, that it has a distinct VPC and lastly that CIDR blocks don't overlap. This will also allow us to enable multi AZ for redundancy.
We will create private and public subnets to match load balancers and RDS instances as well.
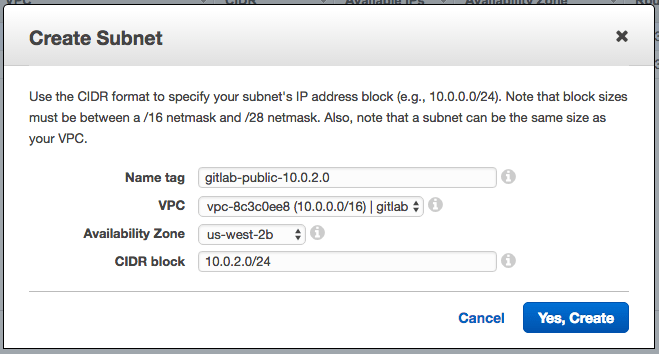
The subnets are listed with their name, AZ and CIDR block:
- gitlab-public-10.0.0.0 - us-west-2a - 10.0.0.0
- gitlab-private-10.0.1.0 - us-west-2a - 10.0.1.0
- gitlab-public-10.0.2.0 - us-west-2b - 10.0.2.0
- gitlab-private-10.0.3.0 - us-west-2b - 10.0.3.0
Route Table
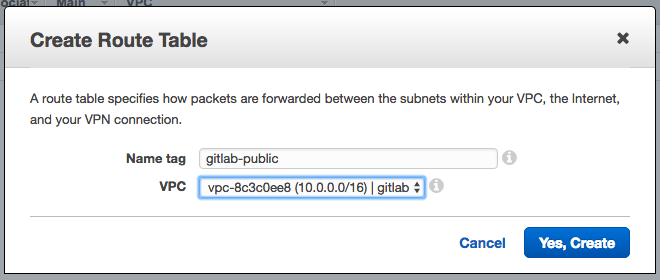
Up to now all our subnets are private. We need to create a Route Table to associate an Internet Gateway. On the same VPC dashboard choose Route Tables on the left column and give it a name and associate it to our newly created VPC.
Internet Gateway
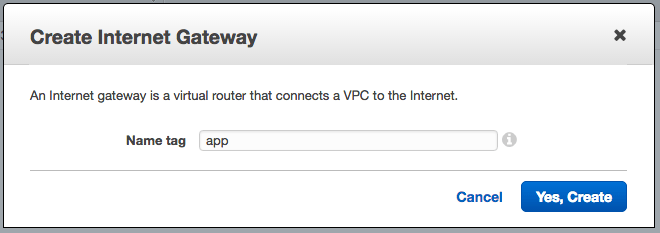
Now still on the same dashboard head over to Internet Gateways and
create a new one. After its created pres on the Attach to VPC button and
select our VPC.
Configure Subnets
Go back to the Router Tables screen and select the newly created one, press the Routes tab on the bottom section and edit it. We need to add a new target which will be our Internet Gateway and have it receive traffic from any destination.
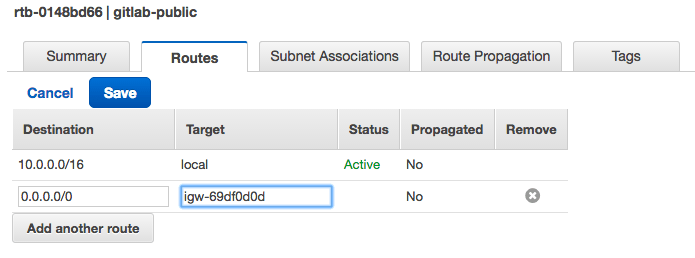
Before leaving this screen select the next tab to the rgiht which is Subnet Associations and add our public subnets. If you followed our naming convention they should be easy to find.
Database with RDS
For our database server we will use Amazon RDS which offers Multi AZ for redundancy. Lets start by creating a subnet group and then we'll create the actual RDS instance.
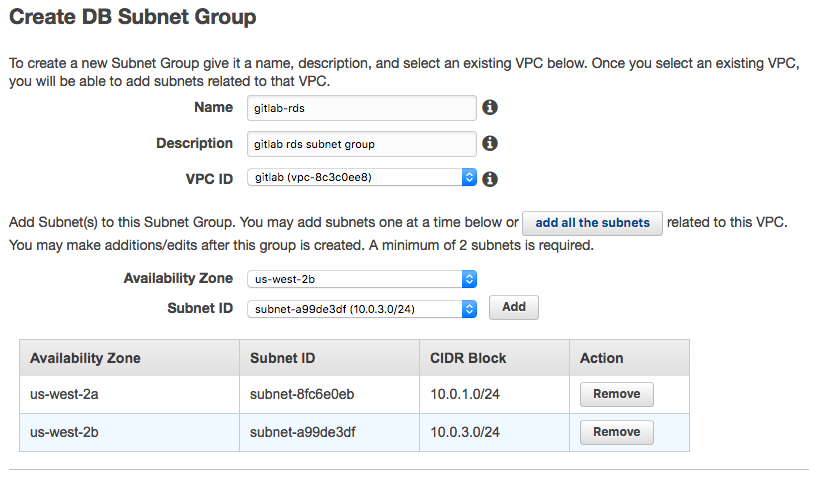
Subnet Group
From the RDS dashboard select Subnet Groups. Lets select our VPC from the VPC ID dropdown and at the bottom we can add our private subnets.
RDS
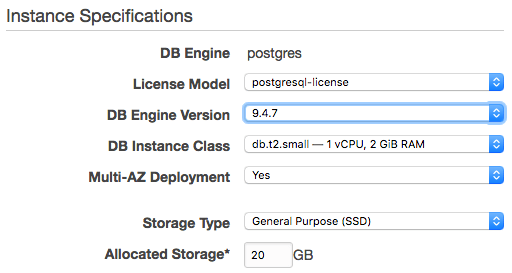
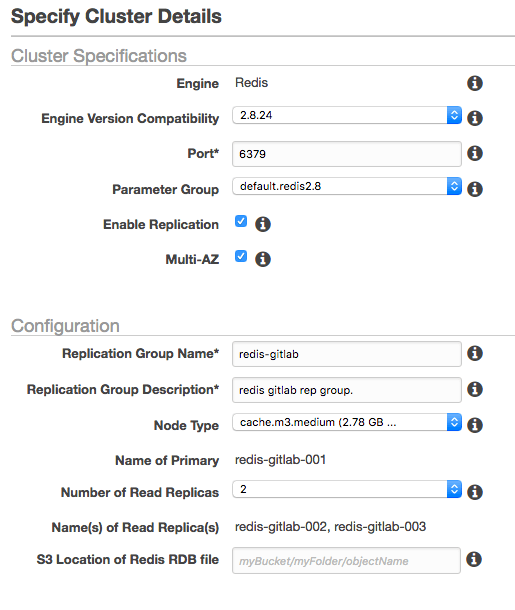
Select the RDS service from the Database section and create a new PostgreSQL instance. After choosing between a Production or Development instance we'll start with the actual configuration. On the image bellow we have the settings for this article but note the following two options which are of particular interest for HA:
- Multi-AZ-Deployment is recommended as redundancy. Read more at High Availability (Multi-AZ)
- While we chose a General Purpose (SSD) for this article a Provisioned IOPS (SSD) is best suited for HA. Read more about it at Storage for Amazon RDS
The rest of the setting on this page request a DB identifier, username
and a master password. We've chosen to use gitlab-ha, gitlab and a
very secure password respectively. Keep these in hand for later.
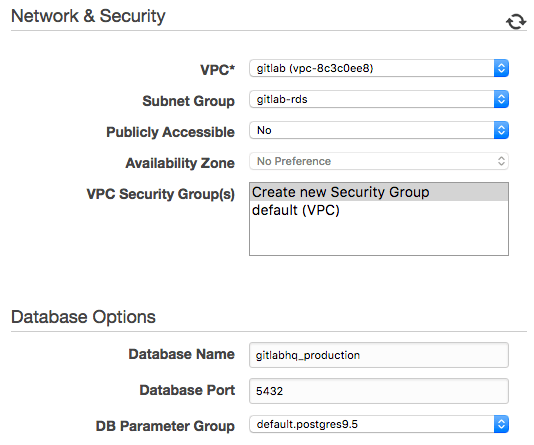
Make sure to choose our gitlab VPC, our subnet group, not have it public,
and to leave it to create a new security group. The only additional
change which will be helpful is the database name for which we can use
gitlabhq_production.
ElastiCache
EC is an in-memory hosted caching solution. Redis maintains its own persistance and is used for certain types of application.
Let's choose the ElastiCache service in the Database section from our AWS console. Now lets create a cache subnet group which will be very similar to the RDS subnet group. Make sure to select our VPC and its private subnets.

Now press the Launch a Cache Cluster and choose Redis for our DB engine. You'll be able to configure details such as replication, Multi AZ and node types. The second section will allow us to choose our subnet and security group and

Network File System
GitLab requires a shared filesystem such as NFS. The file share(s) will be mounted on all application servers. There are a variety of ways to build an NFS server on AWS.
One option is to use a third-party AMI that offers NFS as a service. A search for 'NFS' in the AWS Marketplace shows options such as NetApp, SoftNAS and others.
Another option is to build a simple NFS server using a vanilla Linux server backed by AWS Elastic Block Storage (EBS).
Note: GitLab does not recommend using AWS Elastic File System (EFS). See details in High Availability NFS documentation
Initiate AMI
We are going to launch an EC2 instance and bake an image so that we can later use it for auto scaling. We'll also take this opportunity to add an extension to our RDS through this temporary EC2 instance.
EC2 Instance
Look for the EC2 option and choose to create an instance. We'll need at least a t2.medium type and for this article we'll choose an Ubuntu 14.04 HVM 64-bit. In the Configure Instance section choose our GitLab VPC and a public subnet. I'd choose at least 10GB of storage.
In the security group we'll create a new one considering that we need to
SSH into the instance and also try it out through http. So let's add the
http traffic from anywhere and name it something such as
gitlab-ec2-security-group.
While we wait for it to launch we can allocate an Elastic IP and associate it with our new EC2 instance.
RDS and Redis Security Group
After the instance is being created we will navigate to our EC2 security
groups and add a small change for our EC2 instances to be able to
connect to RDS. First copy the security group name we just defined,
namely gitlab-ec2-security-group, and edit select the RDS security
group and edit the inbound rules. Choose the rule type to be PostgreSQL
and paste the name under source.
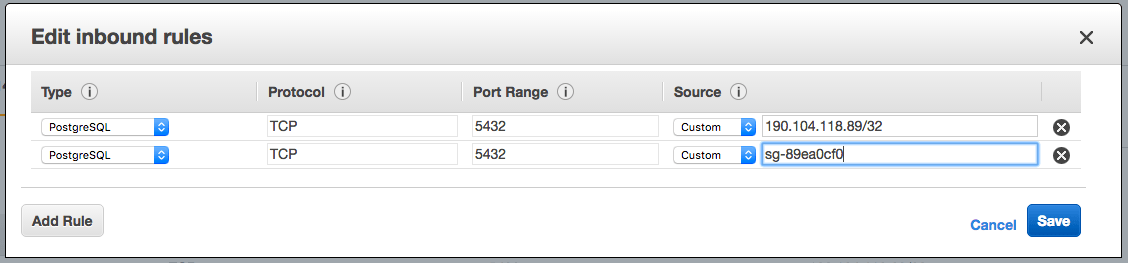
Similar to the above we'll jump to the gitlab-ec2-security-group group
and add a custom TCP rule for port 6379 accessible within itself.
Install GitLab
To connect through SSH you will need to have the pem file which you
chose available and with the correct permissions such as 400.
After accessing your server don't forget to update and upgrade your packages.
sudo apt-get update && sudo apt-get upgrade -yThen follow installation instructions from GitLab, but before running reconfigure we need to make sure all our services are tied down so just leave the reconfigure command until after we edit our gitlab.rb file.
Extension for PostgreSQL
Connect to your new RDS instance to verify access and to install a required extension. We can find the host or endpoint by selecting the instance and we just created and after the details drop down we'll find it labeled as 'Endpoint'; do remember not to include the colon and port number.
sudo /opt/gitlab/embedded/bin/psql -U gitlab -h <rds-endpoint> -d gitlabhq_production
psql (9.4.7)
Type "help" for help.

gitlab=# CREATE EXTENSION pg_trgm;
gitlab=# \q
Configure GitLab
While connected to your server edit the gitlab.rb file at /etc/gitlab/gitlab.rb
find the external_url 'http://gitlab.example.com' option and change it
to the domain you will be using or the public IP address of the current
instance to test the configuration.
For a more detailed description about configuring GitLab read Configuring GitLab for HA
Now look for the GitLab database settings and uncomment as necessary. In our current case we'll specify the adapter, encoding, host, db name, username, and password.
gitlab_rails['db_adapter'] = "postgresql"
gitlab_rails['db_encoding'] = "unicode"
gitlab_rails['db_database'] = "gitlabhq_production"
gitlab_rails['db_username'] = "gitlab"
gitlab_rails['db_password'] = "mypassword"
gitlab_rails['db_host'] = "<rds-endpoint>"
Next we only need to configure the Redis section by adding the host and uncommenting the port.
The last configuration step is to change the default file locations to make the EFS integration easier to manage.
gitlab_rails['redis_host'] = "<redis-endpoint>"
gitlab_rails['redis_port'] = 6379
Finally run reconfigure, you might find it useful to run a check and a service status to make sure everything has been setup correctly.
sudo gitlab-ctl reconfigure
sudo gitlab-rake gitlab:check
sudo gitlab-ctl status
If everything looks good copy the Elastic IP over to your browser and test the instance manually.
AMI
After you finish testing your EC2 instance go back to its dashboard and while the instance is selected press on the Actions dropdown to choose Image -> Create an Image. Give it a name and description and confirm.
Load Balancer
On the same dashboard look for Load Balancer on the left column and press the Create button. Choose a classic Load Balancer, our gitlab VPC, not internal and make sure its listening for HTTP and HTTPS on port 80.
Here is a tricky part though, when adding subnets we need to associate public subnets instead of the private ones where our instances will actually live.
On the secruity group section let's create a new one named
gitlab-loadbalancer-sec-group and allow both HTTP ad HTTPS traffic
from anywhere.
The Load Balancer Health will allow us to indicate where to ping and what makes up a healthy or unhealthy instance.
We won't add the instance on the next session because we'll destroy it momentarily as we'll be using the image we where creating. We will keep the Enable Cross-Zone and Enable Connection Draining active.
After we finish creating the Load Balancer we can re visit our Security Groups to improve access only through the ELB and any other requirement you might have.
Auto Scaling Group
Our AMI should be done by now so we can start working on our Auto Scaling Group.
This option is also available through the EC2 dashboard on the left
sidebar. Press on the create button. Select the new image on My AMIs and
give it a t2.medium size. To be able to use Elastic File System we need
to add a script to mount EFS automatically at launch. We'll do this at
the Advanced Details section where we have a User Data
text area that allows us to add a lot of custom configurations which
allows you to add a custom script for when launching an instance. Let's
add the following script to the User Data section:
#cloud-config
package_upgrade: true
packages:
- nfs-common
runcmd:
- mkdir -p /gitlab-data
- chown ec2-user:ec2-user /gitlab-data
- echo "$(curl --silent http://169.254.169.254/latest/meta-data/placement/availability-zone).file-system-id.aws-region.amazonaws.com:/ /gitlab-data nfs defaults,vers=4.1 0 0" >> /etc/fstab
- mount -a -t nfs
- sudo gitlab-ctl reconfigure
On the security group section we can chosse our existing
gitlab-ec2-security-group group which has already been tested.
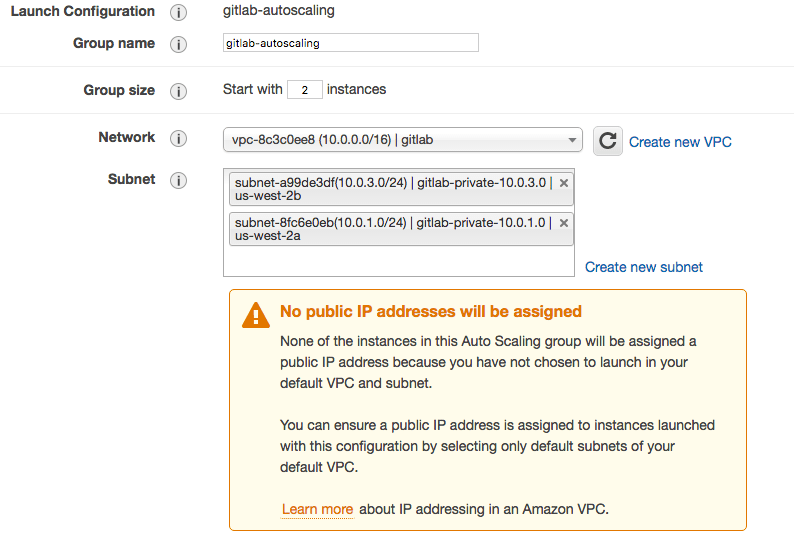
After this is launched we are able to start creating our Auto Scaling Group. Start by giving it a name and assinging it our VPC and private subnets. We also want to always start with two instances and if you scroll down to Advanced Details we can choose to receive traffic from ELBs. Lets enable that option and select our ELB. We also want to use the ELB's health check.
Policies
This is the really great part of Auto Scaling, we get to choose when AWS launches new instances and when it removes them. For this group we'll scale between 2 and 4 instances where one instance will be added if CPU utilization is greater than 60% and one instance is removed if it falls to less than 45%. Here are the complete policies:
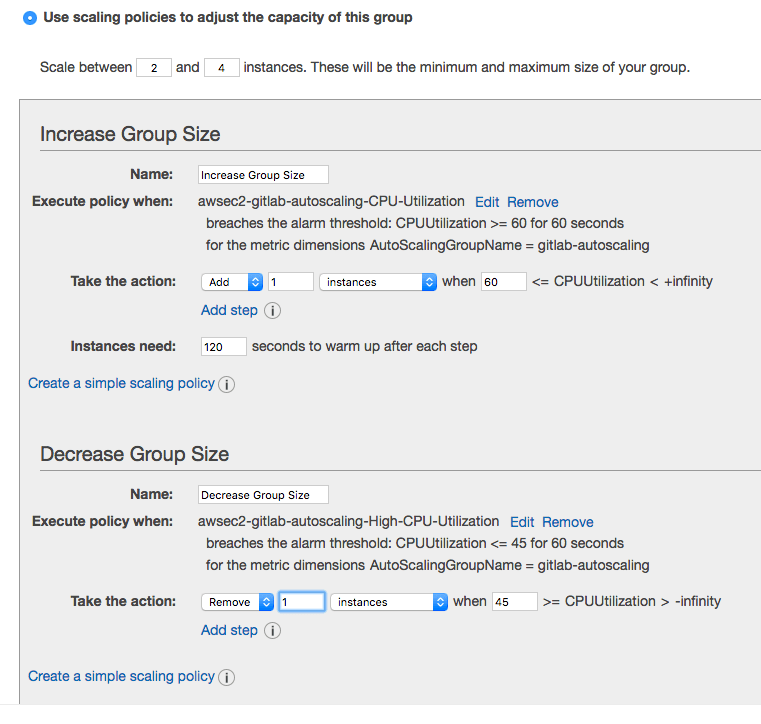
You'll notice that after we save this AWS starts launching our two instances in different AZs and without a public IP which is exactly what we where aiming for.
Final Thoughts
After you're done with the policies section have some fun trying to break instances. You should be able to see how the Auto Scaling Group and the EC2 screen start bringing them up again.
High Availability is a very big area, we went mostly through scaling and some redundancy options but it might also imply Geographic replication. There is a lot of ground yet to cover so have a read through these other resources and feel free to open an issue to request additional material.